WSO2 CEP and WSO2 Business Activity Monitor have support for JMX MBeans monitoring. You can find the docs for JMX MBeans monitoring for WSO2 BAM from here.
I'm writing this blog to illustrate how WSO2 CEP can be used to monitor the JMX MBeans, and I'm using ActiveMQ JMS broker as an example to demonstrate its capabilities.
Here I have used apache-activemq-5.4.3
First we need to enable ActiveMQ JMS broker to support JMX remotely.
To do so, you have to enable JMX in the broker, in the <activemq_home>/conf/activemq.xml:
<broker xmlns="http://activemq.org/config/1.0" brokerName="localhost" useJmx="true">
and
<managementContext>
    <managementContext connectorPort="1099" />
</managementContext>
Now you have to enable JMX in the JVM parameters in <activemq_home>/bin/activemq:
Locate the line
ACTIVEMQ_OPTS="$ACTIVEMQ_OPTS $SUNJMX $SSL_OPTS"
and change it to:
ACTIVEMQ_OPTS="$ACTIVEMQ_OPTS $SUNJMX $SSL_OPTS -Dcom.sun.management.jmxremote -Dcom.sun.management.jmxremote.ssl=false -Dcom.sun.management.jmxremote.authenticate=false"
To test whether its correctly working run "jconsole"
and connect to the
broker via: service:jmx:rmi:///jndi/rmi://your_host:1099/jmxrmi
Now we need to Enable to CEP to receive JMX Events
To do so first we need to install JMX Agent to CEP
Add 4.0.7 P2 repository form the URL http://dist.wso2.org/p2/carbon/releases/4.0.7
Next install the "BAM JMX Agent Aggregate"
Use http://docs.wso2.org/wiki/display/CEP210/Installing+Features for guidence

Restart CEP.
Now we need to configure JMX.
To do so, go to Configure -> JMX Agent
Click on "Add Profile" and configure he profile as below

Here use the Data Receiver user name & password as "admin" & "admin"
JMX Server URL as service:jmx:rmi:///jndi/rmi://your_host:1099/jmxrmi
and JMX Server user name & password as "admin" & "activemq"
Then click on the "Load Means" button to load the available MBeans,
Note : ActiveMQ need to be up an running in-order to load its MBeans
Next when you click on the appropriate MBean a dropdown will appear showing its attributes.

You have to select your relevant attributes one by one from the drop down.

You also need to change the Alias to a much readable strings,
For this Example I have used:
BrokerName, TotalEnqueueCount, TotalDequeueCount, TotalMessageCount, MemoryPercentUsage
Now click "Save" to save & deploy the JMX Agent.
When we add the above configuration JMX agent will automatically create the following WSO2 Event Stream Definition
When we add the above configuration JMX agent will automatically create the following WSO2 Event Stream Definition
{
    "streamId": "org.wso2.bam.jmx.agent.activemq:1.0.0",
    "name": "org.wso2.bam.jmx.agent.activemq",
    "version": "1.0.0",
    "nickName": "JMX Dump",
    "description": "JMX monitoring data",
    "metaData": [{
        "name": "clientType",
        "type": "STRING"
    }, {
        "name": "host",
        "type": "STRING"
    }],
    "payloadData": [{
        "name": "BrokerName",
        "type": "STRING"
    }, {
        "name": "TotalEnqueueCount",
        "type": "LONG"
    }, {
        "name": "TotalDequeueCount",
        "type": "LONG"
    }, {
        "name": "TotalMessageCount",
        "type": "LONG"
    }, {
        "name": "MemoryPercentUsage",
        "type": "INT"
    }]
}
Next step is creating a CEP Bucket to use JMX event.
To do this:
- Shutdown CEP
- Run "ant deploy-broker-manager" from <cep_home>/samples/cep-samples
- Copy paste activemq-all-xxx.jar from the <activemq_home> directory to <cep_home>/samples/lib directory.
- Copy paste activemq-core-xxx.jar and geronimo-j2ee-management_1.1_spec-1.0.1.jar from <activemq_home>/lib to <cep_home>/repository/components/lib directory.
- Copy the queue-monitor.xml to <cep_home>/repository/deployment/server/cepbuckets
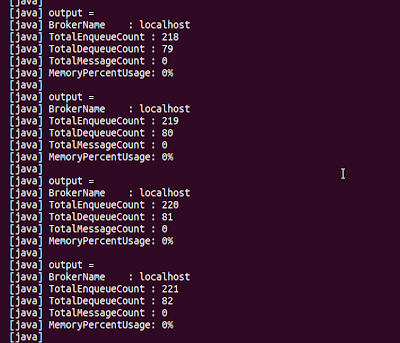
- In a new terminal run "ant jmsSubscriber -Dtopic=QueueInfo" from <cep_home>/samples/cep-samples to receive the outputs of the queue-monitor bucket.
- Start CEP
Now try running the Queue example which is in the <amq_home>/example.
In a new terminal run "ant consumer" to run the sample consumer
In a new terminal run "ant producer" to send some sample messages to the ActiveMQ Queue.
you will be able to view some appropriate outputs in CEP QueueInfo jmsSubscriber
